October 9, 2017 –
One of the best ways to boost your productivity is improving your desktop organization. And in this case, we mean your physical desktop organization. It’s time to ditch the post-it notes and scraps of paper and capture your to-do items in a simple task list. Many of us are using the robust Microsoft Outlook platform but few are using it to its full potential. A great way to get more from the program (beyond email and calendars) is by using Outlook Tasks.
Getting Started with Microsoft Outlook Tasks
Outlook Tasks have been around for years, but you’re not alone if you’ve never tried it…. it’s amazing how few people use this valuable functionality. There are entire books devoted to the subject of how to use Microsoft Outlook Tasks to be more productive, but to get started you just need this simple guide.
Step 1: Enter in a new task
To get started, grab a few of those post it notes (or that random to-do list floating in your head) and begin creating a new task.
- Create a new task:
- Option 1 (quick method): While Outlook is open, press “Ctrl + Shift + K” to create a new task. This is our favorite method because you can quickly create a new task when you think of something you need to do. Over time this becomes instinct rather than reaching for a pen and paper.
- Option 2: Depending on your version of Outlook, Select “Home” in Outlook and in the top ribbon click on “New Items”. Select “Task” from the drop-down list or go into the Tasks section of Outlook and select the “New Task” from the top ribbon.
- Fill in the Task Information:
- Enter in the subject. Make this action-oriented about a specific thing you need to do. For example “email payroll department about upcoming check run” or “call plumber to fix master bathroom”.
- In the area for “Start date” put in the actual date you will start working on the activity. This will help later when you display tasks in your calendar view.
- Optionally feel free to add status, reminders, etc. if you’d like.
- If you would like to assign a category, please read the “Want to Take it to the Next Level” section below. If not, feel free to skip this for now. You can organize and add categories later if desired.
- Select “Save and Close”.
Step 2: Displaying & Reviewing your Outlook Tasks
You can obviously review your full list of tasks in the Task section of outlook, but what is really powerful is that tasks also show up in the calendar on the day and week views. These views can be customized according to your preferences.
- Open your Calendar view in Outlook
- Select “View” from the top menu and go to the Arrangement section. Select either the “Day”, “Work Week”, or “Week” icon as you prefer. You can toggle between these as often as you like.
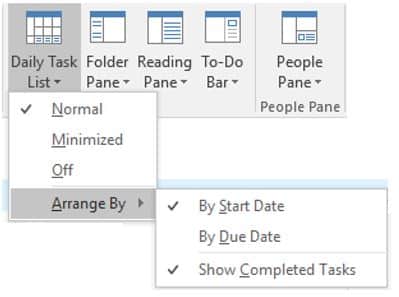
- In the “Layout” section, select the “Daily Task List” icon and be sure it is set to “normal”. At the bottom of the drop-down list select “Arrange by” and select “By Start Date”. Be sure “Show Completed Tasks” is checked.
This will create a section at the bottom of the calendar view which includes your “to do” list for each day. Now at a glance you can see what you need to work on each day. You can even block the appropriate time required on your calendar to work on a task. You can also see when you’ve perhaps over-committed and adjust your task Start Date accordingly.
Step 3: Complete Your Task
What a sweet feeling it is to check something off your list! To mark a task as completed, open the task and change the status to “Completed” by using the drop-down box. Or if you prefer, right from the list you can right click and select “Mark Complete”.
The task will still show up on your calendar for that day, with a strike-through to indicate you’ve crossed it off your list. If you don’t complete the task on time, it will automatically roll over to the next day for you, so there’s no need to worry about “lost” tasks as time moves on.
Want to take it to the Next Level?
If you want to become more advanced, you can explore the use of categories for your task list, so you can group tasks into similar areas such as “personal” or maybe several smaller tasks that relate to a bigger project. The options are endless and depend upon your own organizational preferences, but this is a great way to organize your overall list of tasks.
When you are in a task, select “Categorize” from the top ribbon. Outlook comes loaded with some default categories, but you can add new ones by selecting “All Categories” from the bottom of the list. That will open a new window where you can add, rename, delete, and create color schemes for your categories. Think about how you like to group tasks and create a category for each group. In your Tasks section of Outlook you can sort your full task list by category which can be a useful way of organizing your list.
For more information on getting the most from Microsoft Outlook and improving your productivity call us at (866) 407-1284, email us at Info@ait2022.wpengine.com, or use the Contact Us page.
Happy organizing!
– The AccountabilIT Team