Cloud servers 40% cheaper with Microsoft Hybrid Use Benefit (HUB)
What organization doesn’t want to save 40% on computing infrastructure costs? If you are a “Windows shop” that is on or starting a cloud journey, you need to know about Microsoft’s Hybrid Use Benefit (HUB) for Windows servers in Azure…or you will pay too much! A “Windows shop” in this case specifically means your organization has previously purchased Windows server licenses with the “Software Assurance” (SA) benefit. HUB lets you convert or reuse Windows Server Datacenter and Standard edition licenses covered with SA.
When you deploy server images in Azure running the Windows Server operating system (OS), Microsoft assumes you need to pay for the Windows server license. The cost for a Windows OS license is included in the monthly ‘base compute rate’ for Windows IaaS (Infrastructure as a Service) servers in Azure. If you have SA on previously purchased Windows Server licenses, you can use the benefit in Azure—essentially paying the same base rate as Linux virtual machines (VMs), which don’t include a Windows OS license. Figure 1 illustrates what this means in cost reduction: For two VMs in the cloud, it’s about a thousand dollars saved per year!

Figure 1 – Sample annual cost comparison of two D2 V2 Promo Windows Server VMs
Who is eligible to use HUB?
Not every customer and not every Azure virtual machine (VM) is eligible for these discounts. Here are the requirements to use the benefit on an Azure VM:
- HUB is available if you own Windows Server Standard or Datacenter edition licenses with active Software Assurance (SA). It is not restricted to any specific licensing program. If you are a new Microsoft customer and don’t own any Windows Server OS licenses yet, then HUB is not for you.
- For every 2-processor Windows Server license or Windows Server license with 16-cores covered with Software Assurance, you will receive either of the following:
- Up to two virtual machines with up to 8 cores or
- One virtual machine with up to 16 cores
- There are four Windows Server images that you can use with either Datacenter or Standard licenses. If you own Standard Edition, for example, you can use Datacenter Edition images in Azure. Here is a list of the images:
- Windows Server 2008 R2 SP1
- Windows Server 2012 Datacenter
- Windows Server 2012 R2 Datacenter
- Windows Server 2016 Datacenter
- Datacenter Edition benefits allow for simultaneous usage both on-premisess and in Azure (that is, one VM on-premisess and one VM in Azure, either with up to 8 cores). Standard Edition customers can convert the license only into Azure VMs, and once the Azure Hybrid Use Benefit is assigned to Azure, you cannot use the Standard Edition license on-premisess.
- You may run virtual machines with more than 16 cores by stacking licenses. For example, for two 2-processor licenses or two 16-core licenses, you may run a virtual machine with up to 32 cores.
- Use of HUB does not change the 90-day assignment rule for Windows Server, which requires licenses to stay assigned to the same hardware for a minimum of 90 days. This rule also applies to Azure virtual machines.
- You need an Azure subscription and if you don’t have one, you can very quickly get a Pay as you Go Azure subscription
Use PowerShell to Check the LicenseType of Azure VMs
If you want to keep tabs on which VMs in your Azure subscription(s) are using HUB, the only way to learn this presently is with an Azure PowerShell query that exposes the LicenseType attribute. After logging into your Azure subscription with the PowerShell cmdlet Login-AzureRmAccout, type the cmdlet Get-AzureRmVM | fl Name,Type,Location,LicenseType to list all the VMs in your subscription. Figure 2 shows the results of a subscription with two VMs, the first of which (“CSR2”) is not using HUB (“LicenseType” is blank) and the second (“RDS2”) is using HUB (LicenseType is “Windows_Server”).
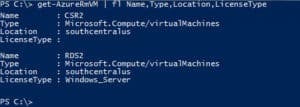
Figure 2 – Azure VM LicenseType “Windows_Server” means HUB is applied
Three Ways to Enable HUB
You need to have ‘new workloads’ for Azure. If you have a VM in Azure already that was not deployed or provisioned with HUB when it was created, then you cannot retroactively change the billing type without redeploying the workload as if it were new. There are three ways to enable HUB on a new VM in Azure:
- Deploy a VM from the Azure Portal or via PowerShell through the Azure Marketplace
- Upload a custom VM and deploy using a Resource Manager template
- Migrate existing virtual machines with Azure Site Recovery
The rest of this article will cover in detail these mechanisms to leverage HUB.
Deploy a VM from the Azure Portal or via PowerShell through the Azure Marketplace
The easiest way to begin using the Hybrid Use Benefit (HUB) is to deploy a new VM using Azure PowerShell or from the Azure portal. The –LicenseType parameter is available with the New-AzureRmVM cmdlet. Just add LicenseType “Windows_Server” to the cmdlet, for example:
New-AzureRmVM -ResourceGroupName “myResourceGroup” -Location “West US” -VM $vm -LicenseType “Windows_Server”
Using the Azure Portal user interface, as seen in Figure 3, on the first blade of the Create virtual machine workflow in your Azure portal you will find the Save Money option. Just select Yes when you are creating your new VM, and you are done!
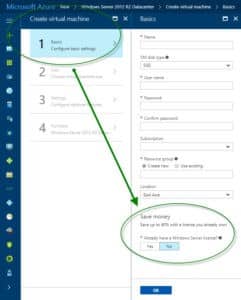
Figure 3 – Select the “Save money” option to activate Hybrid Use Benefits on a new Azure VM
You can also deploy a new VM pre-configured to use HUB from the Azure Marketplace. To deploy a VM from the marketplace using PowerShell, you need to know the Publisher, Offer, and SKU for the desired image. For HUB-enabled images, the “Publisher” is MicrosoftWindowsServer and the “Offer” name is “WindowsServer”. Figure 4 shows how to run the Get-AzureRmVMImageSKU cmdlet to list the available SKUs for the offer.
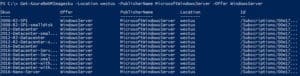
Figure 4 – Use the Get-AzureRmVMImageSKU cmdlet to list the SKUs available for a the HUB publisher and offer
Once you have verified the SKU for the Windows Server OS image that you need, execute the $cred, $vmConfig, and New-AzureRmVM steps in the Create Virtual Machine section of this article: https://docs.microsoft.com/en-us/azure/virtual-machines/windows/quick-create-powershell
Upload a custom VM and deploy using a Resource Manager template
A popular feature with Azure customers is the ability to upload custom Windows Server images as base builds prepared via the Sysprep utility. New VMs in Azure can be cloned from this image and provide a high degree of standardization and security across multiple OS instances. You upload your custom VM image to Azure in the Virtual Hard Drive (VHD) format using the Add-AzureRmVHD cmdlet.
Within your Resource Manager templates to deploy Azure VMs from the custom image, an additional parameter for licenseType is specified. Once you have your VHD uploaded to Azure, edit your Resource Manager template to include the license type as part of the compute provider and deploy your template as normal. For example this JSON extract from a template for Windows Server includes -LicenseType “Windows_Server” just like the New-AzureRmVM cmdlet:
“properties”: {
“licenseType”: “Windows_Server”,
“hardwareProfile”: {
“vmSize”: “[variables(‘vmSize’)]”
}
Migrate existing virtual machines with Azure Site Recovery
Microsoft’s Azure Site Recovery (ASR) is an Azure-based public cloud service that replicates on-premisess physical servers, VMWare VMs, and Hyper-V VMs to Azure. In-Azure VM replicas can be activated for test purposes as well as “failed over” status where the Azure VM assumes production status and either ends the replication or optionally reverses the replication for possible fail-back.
ASR can be used as an efficient one-way migration engine for on-premisess computers. In other words, you don’t use ASR for DR but for migration. This scenario particularly lends itself to the HUB since on-premisess Windows computers may already have Windows Server with Software Assurance (SA) licenses that can be converted and avoid paying twice for the Windows Server license. To migrate on-premisess Windows Server licenses to Azure along with the VM:
- Enable ASR replication of the computer to be migrated in your usual manner. Make sure the Azure portal Replicated items list shows a “Protected” status for the computer.
- Run the Azure PowerShell cmdlets Get-AzureRmSiteRecoveryFabric, Set-AzureRmSiteRecoveryReplication, and Get-AzureRmSiteRecoveryJob with the optional –LicenseType switch as described in the Configure migration to use HUB section of this article: https://azure.microsoft.com/en-us/blog/hybrid-use-benefit-migration-with-asr/ .
- The cmdlets in the previous step prepare the ASR replica to use HUB after failover. Execute a Failover and a Complete Migration job against the replica and the resulting VM in Azure will receive the Hybrid Use Benefit.
More resources:
15 minute YouTube video from the Azure education team on how to use HUB